Feeling clever? Here are is a collection of project ideas, documentation and reflection on teaching and learning. When we are Fussing with Stuff, we take greater control of the devices and systems in our lives.
Danny and his daughter returned to Maker Faire for some excitement with building and experimenting. While she was learning to print with silkscreen, he was checking out the Shopbot and surveying the nublabs Fab Lab.
Denise is a chemistry teacher. She put on a contest for her students to design pictures for Mole Day. She brought the pictures to the nublabs FabLab where she used the vinyl cutter to make the stencils. Later that week, she printed the shirts with the students. The students then wore the shirts in schools bearing their custom designs. Limited edition ChemGeek shirts!
She used the techniques for Silkscreen Print With Vinyl described here nublabs operated the Fab Lab at Maker Faire Austin 2008
Steve Davee came to the nublabs Fab Lab at Austin Maker Faire 2008. He has been working on his Maker's Notebook, and shows some of the way he has modded the book and how he has used it as a way of storing and developing his ideas. He also talks about his experiences in education and how he is able to inspire kids to do amazing things. Steve is a teacher at the Opal Charter School in Portland Oregon.
The other day I tried two different building systems in the same environment with teenagers. Geodesic Domes have long been an interest of mine, and I have successfully made a few of them with straws and attempted to use other materials. GIKs or Great Invention Kits are something of a newer building technique. When we were in South Africa, my daughter made a kit with a lot of help from one of the staffers at the Capetown Fab Lab. I have seen samples of them in all the Fab Labs I have been in.
Early in the morning I sent out an email message asking if anybody had a copy of the cutting files I would need to make my own GIKs. Later in the morning I printed up some geodesic dome strut calculations for figuring out what size and how many struts and connectors we would need. With the information, a pen, metric ruler, lots of pipe cleaners and a box of colored straws I set out to measure the struts and cut them. The information came from Desert Domes, where there are a lot of calculators for different frequency domes. Their focus is more on conduit strutted domes, but I have adapted their info to straw domes in the past.
During my process of gathering information and starting to build the geodesic dome, I was able to catch a few people to help out. It was pretty much a "Here is what you have to do, then you have to make some of these, and then some of these..." kind of experience. It was very much tied to the information that I had gotten. Too few struts, or the wrong size, and it won't work. We used a template on a piece of paper to get the sizes consistent. Each of the two sizes of struts (100 mm and 90mm) were a different color, to make identifying them easier. There were 4, 5 and 6 way connectors. Each was made with a different color pipe cleaner.
After most of the struts were complete, I left to go to the Fab Lab at the South End Technology Center. During my time away, the materials were put aside to keep them from getting mixed up. The information was out and visible, but people didn't know enough about the project to figure it out. When I returned later, I brought a sample straw dome made several years earlier and a book on Geodesic Math.
At the Fab Lab, I checked my email to see if there were any files available, but they were not. So I needed to make the files myself and then fabricate the GIK parts. During the process, I wrote up my workflow on how to design the file. The link to the process document is here.
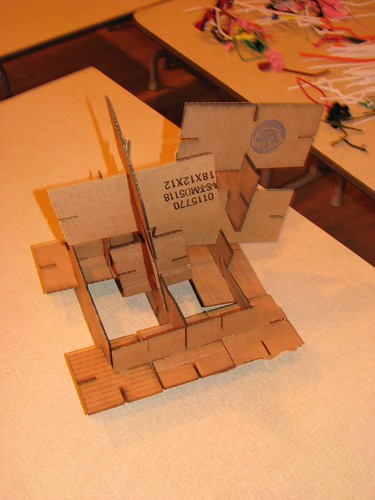
During my session at the lab, I made a few dozen parts of two designs, square 4x4's and rectangular 4x8's. I brought them all with me back to the group, and put them out on the same table as before. This was also a drop by activity, and I did a little recruiting, but not much. I showed a little of how to combine the shapes, and one teenage girl's eyes lit up when I asked her if she would like to try them. She and a few others quickly got the idea of how to attach the tab and slot shapes, and quickly built a shape out of them. As people passed in and out of the group, they added and modified the construction.
The time shifted and people moved on to other activities. I was next in a room with a half dozen teenagers and one other adult. I brought the geodesic dome parts in with me and set out to make the shape from the parts.
In the construction of the geodesic dome, Jen, the other adult said she was "fascinated to watch how I was building this thing", but she did not get engaged enough to join in. I explained what the different coloring was, and how there were colors for the connectors. I showed the diagram used for assembly. During a half hour or so, none of the teens joined in, preferring instead to play a card game (again, it was a personal choice time for the activities). As the dome got built, I had to keep referring to the diagram, and had to make sure I was getting it 'right'. The connectors were not staying in place, and I was clearly struggling to get the whole thing to stay together. I ultimately gave up after the bottom level of triangles was complete, but I could not get the horizontal layer of struts to stay in place without pulling out many of the connectors. I put the parts back into a basket and got them ready to take them home.
During this time, I recalled trying to build a geodesic dome several years ago with my daughter and nieces, all preadolescents. That kit used plastic tubing held together with machine screws and nuts as the connectors, and wooden dowels to serve as struts. On that project, it was me who held the information and them who were serving more as helpers. We tried holding the fittings with duct tape, and even tried screwing the connectors to the dowels. As the kit failed to stay together, they lost interest in the project.
What I see from this experience is that there was only one solution to the Geodesic Dome project/activity. If the parts were the wrong size, or if the directions were not carefully followed, and if all the problems were not resolved properly, then the dome would not stand up.
In the GIK project/activity, there were many solutions. Each person would need a mininum of instruction, and would be free to create anything from imagination. As long as the parts were manufactured with pretty reasonable tolerances, the people using them would be able to get them together. From their assemblies, could come a lot of variations. They would not look exactly like "a building" or "a spaceship", but the ideas could come across in the object.
Certainly there are lots of things that people have done with geodesic domes since their invention by Buckminster Fuller. They have been used as homes, shelters, playground equipment and much more. There is, however a static way in which they must be assembled. Once that level of requirement is met, then they can be used in very creative ways. Materials can be substituted, sheathing can be added, and much more.
What I saw with my experiment trying out the two techniques out on a similar set of teenagers was that it was much more intuitive for people to get engaged with building from a kit of GIKs than from a kit of geodesic dome parts.
Links
Desert Domes -link GIKs - link Instructions on how to make GIK files - Link
Fab Lab and Scratch Field Trip - Saturday Programming
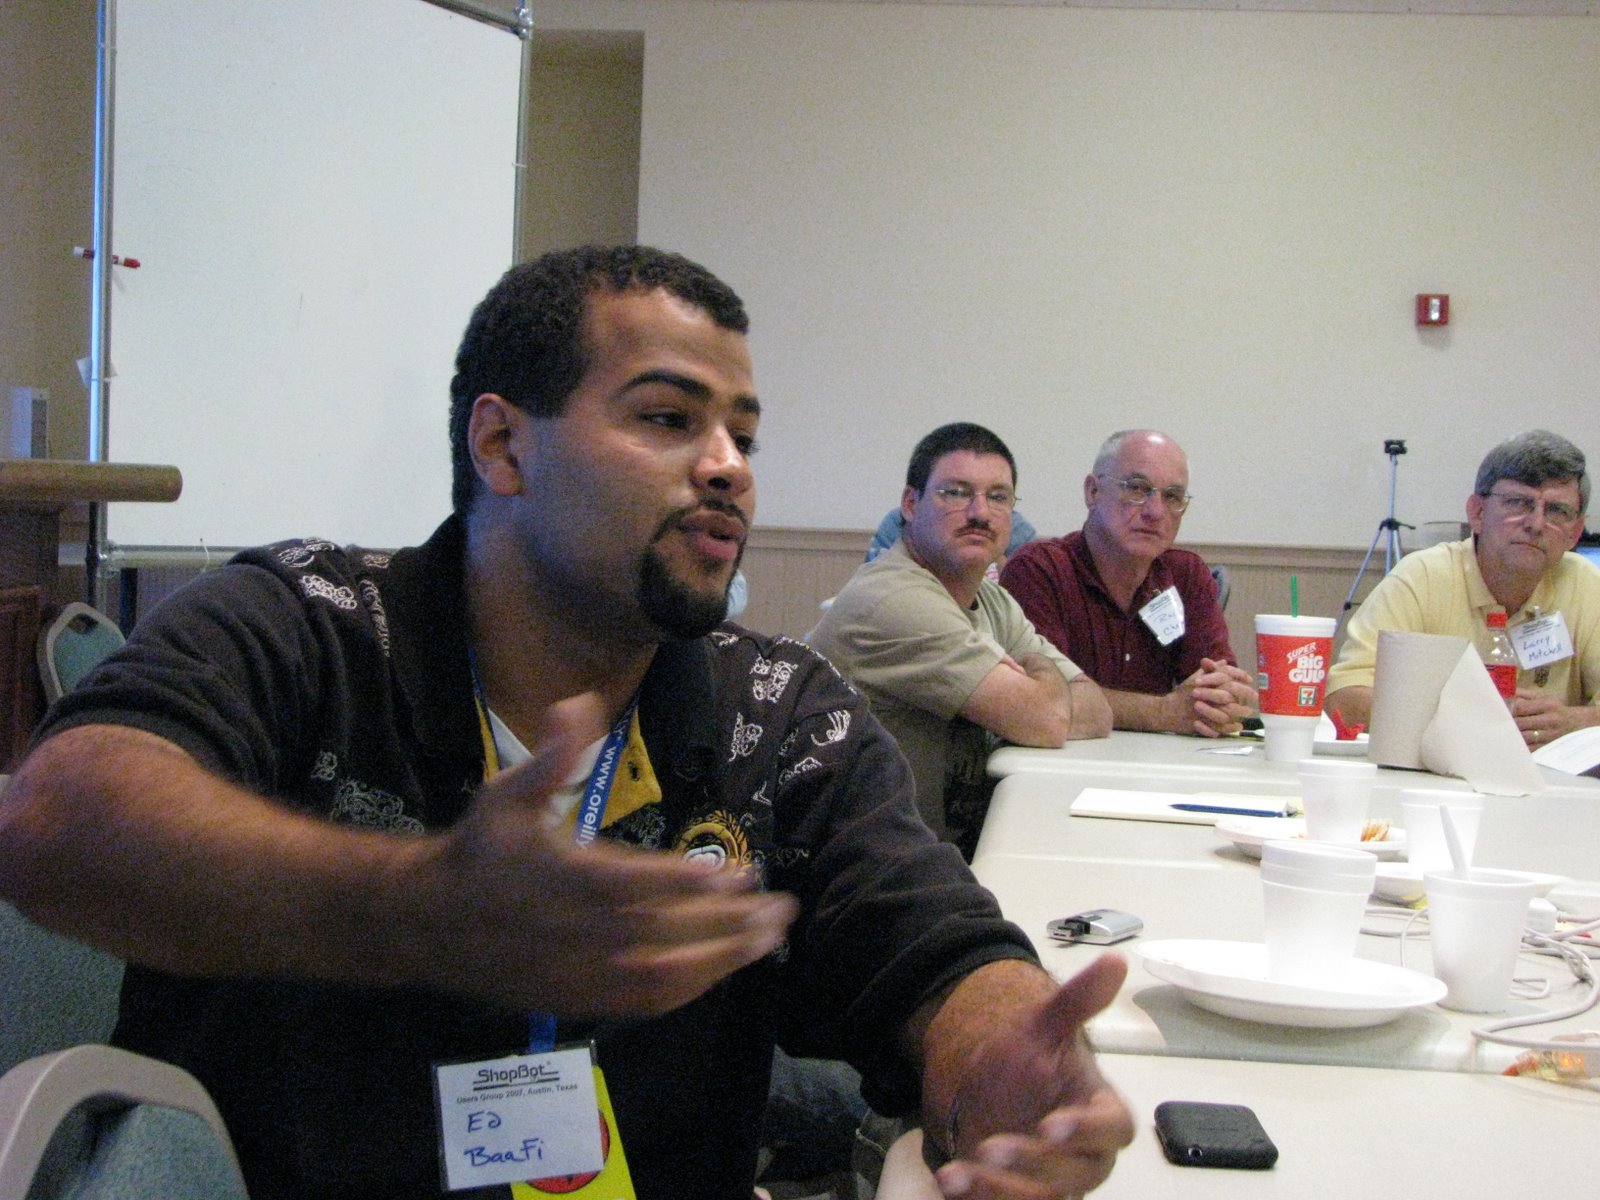
On Saturday February 17, Tim Hovey and I took our Saturday Programming group on the road. The South End Technology Center (SETC) hosted us for the day, where we worked in the Fab Lab in the morning, then experimented with Scratch in the afternoon. We were met by Ed Baafi, who runs the Fab Lab portion of SETC. Ed introduced us to the lab and some of its possibilities. Mel King, who runs the South End Technology Center stopped by for a bit during the morning. Michael Nagle assisted the group in the Fab Lab. Amon Millner of the Lifelong Kindergarten Group at MIT worked with us on Scratch.
We ended up taking the T, but there was some kind of track repair and trains were not running on the usual tracks. Taking the train added at least 45 minutes to our travel time in. I guess that kids ride free on the train, so we actually saved a lot by not having to pay $50 for parking two cars. As it was, it ran $110 to bring the group in and feed them.
Mr. King was there for a few minutes, but I didn't get much of a chance to talk. Things were busy, kids were figuring out how to work the equipment and get what they needed. Nagle helped out with the late morning part of the day. There was a definite Creative Buzz in the room. The kids figured out their pecking order for who would cut on the laser. When Amon finished up his conference, he stopped by. When I left, Geoff and Amon were handling the lab and lockup.
The kids had a great time in the lab. They were all able to make things of their own design, starting with a cardboard product and working up to plexiglass when they had their design right. OpenOffice was new to most of them, making designs that are based on only lines was also a new concept. Kids tend to design stuff with color. The laser doesn't care about color, only line.
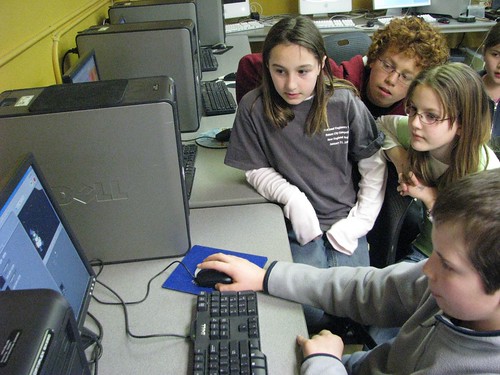
The scratch session was not as productive as I had hoped. They did figure out how to do a bunch of things, but we could have used about another hour to really get some product. The scratch boards don't work with the older version of the software on most of the machines. Most of the kids made accounts on the Scratch site, and saw how to find it by searching for scratch, top entry on the google search. They sounded like they would like to do some more experimentation with it. In about an hour and a half, they were getting the software to work and programming their animations to do what they needed. Alec did a demonstration on how to get the background to change. With headphones, they could hear the audio of what they were programming.
Angela tells me that the group dynamic was a bit off by her observation. She would have liked to work with more of a variety of kids. Two of them were spending too much time working together. I had to tell a some of the boys to moderate their behavior. These suburban kids really don't have their 'city faces' yet. They were excited.
On the whole, everybody agreed that it was a fun time, and they would all like to go back again. We will do some work with scratch at home and in our saturday sessions. I will also see about bringing them over to the high school to show them some of the possibilities there.
At this point, there are some parts of it that can and should be repeated with other groups: We introduced new users to the lab. We showed some of the things that other people had done in the lab, such as some furniture made on the Shopbot and prototypes made on the lasercutter. We demonstrated the software tools of open office and CAM. All the participants had enough time to design at least one thing on open office draw, make a series of cardboard tests, with the lower settings, then a finished piece with the more powerful settings to cut in plexiglass. They had to measure their piece, and place the cut on a piece of plexi that had already been cut by other users. Some of them had the opportunity to make relatively complex designs by merging shapes to remove interior lines. The older kids made more representational pieces, alien, spaceship, star in a circle, while the younger participants were active in making shapes which had their names or other words etched onto the interior. Everybody was able to make something of their own imagining that they could carry a physical representation of out the door. They were universally interested in returning to the lab to make more.
Links photos Nagle's reference to Buzzing Creativity - Link
Scratch Website - Link South End Technology Center Website - SETC Site
Facilitators: Ed Baafi runs the fab lab portion of SETC link Mel King runs the South End Technology Center - link Amon Millner works on the Fab Lab and Scratch projects at the Media Lab link Alec Resnick is a senior at MIT, helped facilitate in the lab - link Mike Nagle is an MIT grad, runs a summer camp in cambridge, will help facilitate - blog link and Camp link Chris Connors is a technology and engineering teacher at Duxbury High School and cofacilitator of the Saturday Morning Programming Group - Connecting link and blog link Tim Hovey is a programmer by profession and helped initiate the Saturday Programming group to fill an unmet need for teaching kids how to use the computer as a tool through programming.
On Friday October 19 Shopbot held a User's Meetup on a prep day for Maker Faire Austin. We were treated to lots of information about how shopbot is changing the way people do business. There were signmakers, boatbuilders, craftspeople and lots of curious, creative people.
For materials, mostly people were working with wood, MDO, Medium Density Urethane (mdu)There were some really neat ideas for signmaking with incredibly complex and innovative designs.
Prototyping was a recurring theme. One signmaker brought in a sign that he made to show a client, and the client liked it so much that they bought several signs of the larger size. A boatbuilder used a scale model to show the client what it would look/feel/weigh like. It helped inform the client before having the boat built. Having an example piece that the client can see and touch helps to illustrate what can be done in your shop.
Moldmaking is a neat thing and was featured in several presentations. We got to see the molds and the resulting products. People were very helpful in sharing information about what products worked and how to apply them.
Rob Bell has made a plug in for Google Sketchup that allows you to output your sketchup designs to the shopbot. He had a really neat dome-ish structure right next to the Shopbot booth.
Geoff Neilsen from the Fab Lab group explained how he is using the ShopBot to cut aluminum to make a desktop cnc machine. He is also using the shopbot to cut Delrin, which cuts almost like wax, but has strength similar to aluminum.
Later in the weekend, the Shopbot guys were very helpful in helping to set up our shopbot at the Fab Lab, helped us use the Shopbot to plane the surface of the silkscreen frames, and put on a couple of good cookouts.
It was good seeing how they use various hold down techniques. I liked their vacuum hold down board made out of luan and foam. They also had a nice vacuum shoe for keeping the dust down. At DHS Fab we have an older router, not the spindle, so we would have to make up a different vac setup. Bill Young said that there should be some files online for making the vacuum housing.
In the Shopbot booth they also had a computer set up to a couple of stepper motors controlling a pen on a drawing board. I didn't see a control box, could have gone straight from the parallel port. It was running on the Shopbot software.
This conference/ workshop/ meeting session included lots of key people in personal fabrication, Shopbot, Sketchup, FabLabs, Modkit, TechShop, Reprap, EvilMadScientist/CandyFab, Fab@Home and a bunch of O'Reilly editors and writers. A lot of the discussion centered around the possiblities of Personal Fabrication, some on the 'ideal file format' and a bit on the obstacles.
A big question that we discussed was "How do we grow personal fabrication?" Sketchup has a goal that they have of hooking people on the 3d design software within the first 15 minutes. At the Fab Labs, we are working on projects that will get people hooked on working in the lab with fabrication tools in under an hour. Bill Young from Shopbot is wondering how you make personal robotics tools available to people. Ted Hall of Shopbot noted that many tools for personal fabrication are inexpensive and available, but lots of people don't realize it yet. Fab Labs are free community centers and available on a drop in basis. In TechShop, they have a business model similar to that of a health club, where people pay a monthly fee for membership, and have access to the tools on a scheduled basis.
Some of the software that was discussed was: Sketchup, which can be used to model in 3d. Rob Bell has created a plug in to allow users to port their designs to the Shopbot. Inkscape is used in the Fab Labs, Blender is very hard to master, but has lots of open source power. Collada is xml, web based and works with 3D polygons, it was apparently designed for game geometry, but can make useful files for personal fab. Vectric comes from the Shopbot folks. Open Cascade and Maya were discussed. A bunch of people talked about Art of Illusion.
File formats included .stl and .dxf Nothing perfect exists, but people are working with the current situation. It would be easier to standardize some of the hardware if the file format question could be settled.
Some obstacles we identified were: fear - people can be afraid to try things. getting people access to the tools and process so they can try it out. Personal fabrication needs a public face to illustrate what can be done and how to do it. Just getting started can be a block for people. Usability is lacking, the software design tools are a problem, workflow issues block people from creating. Copyright issues are also a concern in an area where it is easy to clone/reverse engineer objects and devices.
Some project ideas that we discussed were Phil Torrone's Iphone stand, two pieces of acrylic that press fit together and hold the iphone at a nice angle for viewing movies. It is cut on the lasercutter, and the files are available online. A good entry level project. Shopbot has a parametric project system that allows users to cusomize known to be accurate designs and scale them up or down. In the Fab labs, we are creating a suite of quick projects to illustrate some of the power and process of each of the tools in the lab.
At 4:00 on Wednesday afternoon Alec Resnick Ed Baafi and I met up at SETC FabLab to pack up the lab and jam it into our luggage We had a 6:30 flight and I was double parked. We moved fast.
In the back of my car was the original box for the Camm1 vinyl cutter purchased with a grant from the Duxbury Education Foundation over the summer. We put in the SETC vinyl cutter, some posters and a bunch of vinyl. Ed had a brand new Modela cnc mill in the original box. We stuffed all kinds of stuff into our luggage, t shirts, soldering irons, and a million small tools and supplies that we were going to need to build a Fab Lab at the Maker Faire. When we got to the check in, Ed and Alec shuffled the contents around so we wouldn't get over charged for heavy bags. Alec carried about 20 sheets of plexiglass as his 'personal item'
We grabbed a bite to eat at Logan, Ed tethered his computer to his iphone so he could set up one of the computers at the SETC FabLab to give us access to the files on the server there. We made our flight, flew to Houston, hung out in the airport for a while, everything was closing, then moved on to Austin. Lots of instruments in the baggage claim. Jose Marinez arrived a few minutes after we did, so we had more company for the wait on the rental car. Ed tethered again and got a better deal on the rental car than the counter would give. We got to the hotel at around 3am. Geoff Neilsen was already at the hotel working on the cnc machine build.
Thursday we had an early morning meeting at the site for the Personal Fabrication Summit. I was extremely tired, but went along for breakfast at Denny's anyway.